Continuing from where I left off on
my finished items from the Spring Ahead garden pottery class, here are more finished items, and there are more on their way soon. All items bear my signature stamp.
This class (and workshop) I made a number of dragon items. You've already seen the
dragon hatchling from the raku course on the weekend. I also made this little hatching eggs:
What do you think? Which on do you prefer?
5) This egg was thrown from 1200 to 1400 g of Big White sculptural clay. It is sprayed with White glaze, and the claw brushed with Amber Celadon glaze, and Copper Red glaze on the nails. Next time I should brush more layers, to achieve some red. All I got was white. But they still look pretty good.
Here are a few more views of this little hatchling :
7) This egg was also thrown from 1200 to 1400 g of Big White sculptural clay. I left it unglazed, adding only Kingsmill wash to the claw (applied heavier on the nails). I really like the rough feel of this one, and the natural colours.
8) I added a third dragon mask to my collection, this one an old grizzled male with little curly horns. It is hand formed from Little John clay (a very beautiful rich-coloured sculptural clay), with a bit of P570 white clay marbled in. The eyes are Forest Green underglaze (with maybe a lighter green mixed in) and glazed Clear. The horns are Red underglaze with Clear glaze coating. And the remainder of the mask is either left untouched, or stained with our Kingsmill stain mix.
9) This little bottle was thrown from a reclaimed mix of P600 porcelain and WSO sculptural clay. The swirly design was slip trailed in White slip. It was dipped in Gordon's Shino glaze. I'm not very happy with the colour scheme, but I like the variations across the vessel.
10) This little vessel was thrown from reclaimed P570 White clay. The design is a combination of a sprig leaf and white slip trailing. It was dipped in Amber Celadon glaze, but the result is not very typical of Amber Celadon. I suspect I hadn't stirred the glaze enough. But it's interesting to get such a matte effect from Amber Celadon. Some parts appear darker and shinier, where I poured it out.
11) This is the Carbon Trap Shino, and the colour range which I find quite beautiful. It is thrown with P570 white clay, and the swirls from slip trailing white slip. I have "Malcolm Davis" written in my notes, but this is Carbon Trap Shino.
12) This is a similar vessel, but with a hollow rim. It has a very beautiful feel to it, light and balanced. As does the previous one. This one was Deep Blue glaze, sponged off, then finished in Pumice Celadon (dipped). Very pleasing result.
13) This big boy was thrown from a marbled mix of P600 porcelain and WSO sculptural clay. It also features a hollow rim. It is glazed inside and on the rim with Khaki glaze. Then I wanted the marbling to show through, so I sprayed the piece in Gerstley Borate. It is an interesting effect. It feels fairly smooth, but also very natural. I'm intrigued by the tan colour, I would have expected more white, but I like the result.
14) This piece was thrown from H550 grey clay, and was just a bit too imperfect for me, so I decided to embrace the imperfection, and carve a pattern into it. I really love this pattern. Our Sombright Green glaze is not considered a food safe glaze, but as this is not a vessel which would likely be used for food or drink, I decided this would be a great piece to try it on again. I was delighted by the outcome. I sprayed it, but intentionally sprayed more at the top (to get the green), and less on the bottom (to get the brown).

15) This bowl was thrown from P570 white clay. I seem to remember it was a bit lop-sided (maybe the bat-mate moved on me, I can't remember), but I ended up pinching the rim into a sort of floral pattern. It is glazed with Amber Celadon all around, with Copper Red added to the inside. I guess the Copper Red was not thick enough, it teased me with only a hint of red. But I'm really pleased with that smeary runny pattern inside. I will definitely try this combination again.
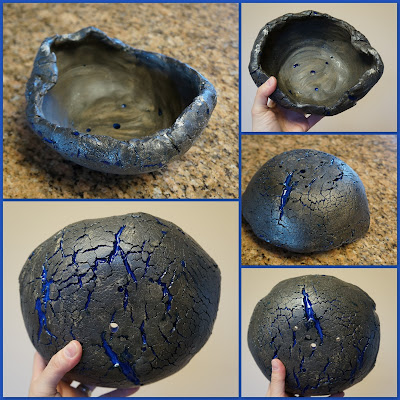
16) This planter has an interesting story. I was planning to add sodium silicate to a slab, crackle it by whacking it against the table to stretch it out, and then flop it into a mold with the crackly side out, to get a planter. But unlike the recycled clay which the rest of the class was using, I used H550 grey clay, and when I added the sodium silicate, and tried to pick it up, it crumbled to pieces. So I worked the clay a bit more, and tried again, and this time, was barely able to pick up the slab, never mind whacking it on the table, and it crackled into the mould. Then I worked the edges for quite a while, so that they looked like they wouldn't crumble.
I had in my head to finish it like this, with black stain all around, and glaze just in the cracks. I discussed it with a couple of the instructors, and they seemed skeptical of my approach. Which gave me all the more resolve to try it out, and prove that I could do it. Which I did. It was stained black, then I waxed the surface, and applied glaze, which settled mostly in the unglazed cracks, and then I wiped a bit of the excess off with a sponge. I really like the bright blue, it looks like a molten inside, ready to ooze through the dry black exterior. I will definitely try something like this again, and with different clay which may be easier to handle.
I will stop there tonight, as I am quite tired, and save the totem pieces (and other things I may pick up soon) for another time. Stay tuned.


No comments:
Post a Comment