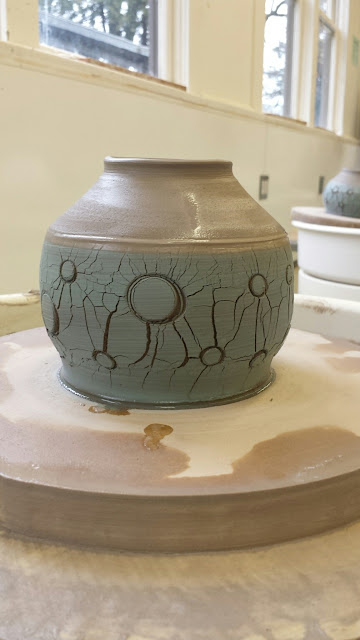
This time, I played mostly with sodium silicate, to create a crackled effect, and the interactions with some stamps and small shape cutters. I was very happy with the results.
Here's a glance at a few of the new pieces, and the two I finished off from last time (back right corner) :
I like how that carved vase turned out. It was a vase I threw toward the end of last session, and the neck didn't turn out too well. But rather than cutting it off even, it inspired me to carve this flowing pattern into it. Here it is from another angle :
This is the first pot I threw :
I love how the plum blossoms pop, and the crackles emanate from the flowers, like electricity.
I left a good amount of clay above the part I treated with sodium silicate, so I could add a proper neck to the vase, making it almost bottle shaped. I am so pleased with this piece in so many ways :
The second vessel also features the plum blossoms, but I applied turquoise slip before the sodium silicate :
Then I tried simple circles also, made with my hole cutter tools (the smaller of which I made in my Pottery Tools course last year) :
For fun, I tried one of my clay stamps, which wouldn't cut through the sodium silicate, but press and weaken that spot :
When pushed out, it also had a different, but pleasing result :
This one seemed to beg for a bit more, so I added another line near the rim, and then I toyed with pushing out that section with sodium silicate also. I debated, and then decided to give it a go. Although I don't know that I like the result better, it was interesting to observe and feel the effect at my fingertips. It was interesting to me that the cracks travelled toward the rim. Perhaps if I had re-moistened that part, it would not have cracked as it did. I'll need to try that another time :
Then I decided to try white slip, and return to the plum blossoms again. It may be fun to underglaze/glaze the flowers on this one, in a bright colour like red :
And finally, I tried alternating panels of regular clay, with clay coated with sodium silicate and stamped. Here is the "before" photo :
...and the "after" photo :
It's interesting how the seams look like they are completely split, yet the clay didn't crack through, it is just the outside surface which split like this. But I ended up needing to go easy on the pushing (so I didn't get as much cracking as I had hoped) since I didn't want to break through those seams.
I also had one pot which went badly off center, so I ended up making it completely wonky ("wabi sabi"), and will take another look at how to finish it next week. If it has good potential, I will trim it, but if not, I may just recycle the clay. It is a rare moment when I do that, but I need to learn how to allow myself that option sometimes.
I decided to force the pieces with the dryer, and try trimming some of them this week. Partly because I'm an impatient person, and I don't know what I may have moved onto next week, and partly because I figured this may give me good control over the dryness of the pieces. I dried the tops enough to flip them into a chuck, but left the bottoms quite wet. Even then, it was quite difficult to trim through the sodium silicate, which runs down and pools at the bottom of the vessel, no matter how much you try to apply only a light amount with the brush. I ended up pretty much cutting off the stiff outer layer with a pin tool before using my trimming tools to do the actual trimming.
Here is one of the pieces, after trimmed, with my signature double foot :
I think that turned out quite well.
And another one, this one with a blurry photo :
And finally for tonight, here are the 4 finished pieces, left on the shelf in the drying cellar, where they should dry fairly slowly, considering the heavy rain we've been having these past few days :
Oh, and I try not to post photos of other student's work unless it is on exhibit, but I can't resist to post this beauty that I spotted in the drying cellar also. Wow. I love working in a place which is so full of inspiration - and great people, too.
I can't wait to see what I get my hands into next week. And in the back of my head, I know I need to switch over to sculptural (groggy) clay and make a few pieces for the raku workshop coming up in early March. But I am waiting to see where inspiration takes me. So far none of the pieces in the last 2 weeks have been particularly suited to raku firing. The totem pieces could work, but I don't want to "waste" the raku firing on an outdoor piece.


No comments:
Post a Comment