Saturday, April 30, 2016

Tiny Tea Cup Finds Its Way Home

I made a mold for creating flowers on Wednesday, and I wanted to make sure it has come out of the bisque firing, in case I go into the studio tomorrow to decorate the large lantern piece.  The stamp was bisqued, and I tried it out :
I think it will work out okay.  Not spectacular results, but much faster than if I were to form these flowers by hand.  And more likely to stay together, since pressed as a single piece of clay.

While I was there, I was pleasantly surprised that a small guinomi (whiskey) or tea cup from our Mud in Your Eye course in the Fall of 2015 had found its way to join my other pieces on the bisque shelf.  I faintly remember at the time thinking that I was one cup short of what I had thrown, but I figured I had made a mistake in my notes, and didn't think much more of it at the time.  But I'm so glad to have this piece now :
I know it was formed with white P570 clay, with the Yellow clay marbled in.  I believe it was sprayed Clear, and dipped in Amber Celadon on the rim.  Nice little piece.

Speaking of missing, it's so strange to me that my weird thrown sculptural piece went missing after it was set on the shelves for the bisque firing, at the end of the Tools Course earlier this year.  It is so distinctive that there is NO chance someone took it by accident thinking it was theirs.  She was a weird one, but I'm still sad not to be able to see her finished.  Maybe one day she will make her way home again, too.

Wednesday, April 27, 2016

Indoor and Outdoor, Hand Building and Wheel Thrown

I am working on a lot of projects at pottery at the moment.  I have pretty much decided to proceed with my first idea for the lantern carving, the clematis growing on a trellis.  When I got there, I realized that the lantern is not nearly as large as I remembered, so I will have only a few bars of trellis, and possibly 2 or 3 flowers on each side.

My teacher offered some sprig molds for the flower and the leaves, but neither were suitable.  The flower since it has 5 petals, not 6 (I know, but I just had it in my head to create a clematis flower), and the leaf since it is too heavily veined and too large.
So I played a bit with hand building the flower, petal by petal, but not only was it a bit time consuming, but I was not sure the flower would hold together well.  Better if it were just one piece.
In the end, I decided to make my own sprig mold, and the teacher assured me that if I put it in the kiln shed today, I'd have it out of the bisque firing by this weekend (if I go to the drop-in workshop Sunday) or for sure by next Wednesday.  So I'll wait for it.  For the leaves, I'm not worried, I can use real leaves to make imprints on clay.  Anyhow, either way, I kept the lantern wrapped, and will return to it when I will be able to make the flowers for it.  I don't want to start carving, since that will allow it to dry out faster.

I did make some progress on my wind-swept house.  I carved some windows (I ran out of time today, so will continue on next opportunity) and a door, and one of my friends, Carol Anne, suggested there should be some birds in the windows.  So I decided it will be an abandoned house, with all the windows blown out, so the birds will be sitting on the windowsills.
Another view :
I'm really liking the look of it.  I think it will be fun in the garden.

I had a few pieces from last week which I finished today.  One was a pot which I trimmed, but the shape was much too ordinary.  Until I added a gecko to it :
The gecko is much too big for the pot.  I would have liked to make him smaller, but it gets more tricky making the little toes and such.  Still, I'm fairly pleased with how this turned out, and it will be a nice surprise if someone turns the pot around and sees the gecko.  Much like my little surprise when we were in Costa Rica last month for Spring Break.  There was some movement when I flushed :

I decorated this garden totem piece with drips of coloured slip (turquoise and black) :

I also threw 6 more pieces in Plainsman 570 white clay, so I will be trimming next week, and decorating them.  I hope for a couple of them to be appropriate for the soda firing workshop which I'm signed up for in late July.
The one at the front (bottom) is a tea cup / tea bowl made from marbled white and yellow clay, then patterned with one of my handmade texture balls, and poked to make indents on the side.  I think it could turn out pretty nicely.  The one at back is another vase / pot with hollow rim.

I like the round shape of the one at front.  I hope to slip trail this one, for the soda firing.  The one at back is a bit too frumpy or ordinary, so I will probably try my hand with a poking stick.  We'll see.

The one at front is an experiment at "bringing it in" at the neck, since I tend to default to wide openings.  I think this could be a pretty nice shape once it's trimmed.  It has good potential for decorating.

Finally, I threw a large shallow bowl / plate, and played with decorating it with turquoise and black slip.  I put the hair dryer to it (on the outside) while I played, so the plate wouldn't slump.  I'm relatively pleased with the result.  It's not quite what I was trying for, but I think it could look pretty dramatic when fired and it turns mostly black.

That was quite a bit of pottery in one day.  I came home very tired, as seems to be the norm in this garden pottery class.  And I didn't even lug my big lantern up and down the stairs.  That would have really wiped me out.

Oh, I should add that I have been creating more maple leaf imprint vases, from two of my earlier pieces.  I posted one already.  Here is the other, in progress :
This is really a smart looking vase, quite rotund, and with a fat hollow rim.  I would like to throw more like this one.

Tuesday, April 26, 2016

Ideas for My Lantern Project

Tomorrow I should make a decision about how to decorate my lantern structure.  It is a tough decision for me.

My tendency is to do something overly complicated, but involving floral patterns, which I love, such as clematis flowers and leaves vining themselves over a trellis.  This could be accomplished with carving alone, or with carving in combination with attachments :
Perhaps a little easier to carve would be a pleasant but abstract curly pattern, something like this :
The more practical would be something involving straight line carving, such as this :
Hmmm, what do you think?  I will try to decide tomorrow.

Wednesday, April 20, 2016

Garden Pottery in Progress

We are into week 3 of the garden pottery course.  We are building pottery for the yard, which is great for me, since I have much more room in my yard than I do in my house for more pottery.  It is also great since we are allowed to build items which are far bigger than we are usually allowed.  Last year, I was pleased to make 2 large platters - see the one on student exhibit.  The intention was to build birdbaths, but large platters for holding fruit on the counter was much more practical for me.

Anyhow, one of the items I have been working on for a couple of weeks now is this large outdoor lantern.  It is about 25 pounds of clay :
I struggled with this one a lot.  I didn't want to make it look like a simple house type lantern.  I was thinking some sort of carving, of flowers climbing a trellis, or something like that.  So I originally planned to add an extruded piece on top, so the piece would be taller.  But today when I tried it out, it looked wrong to me.  So I considered making it into a base for a sculptural piece.  But finally I arrived at this wavy, more funky roof.  Which I think could go nicely with a carving.  I just need to think a bit more about the design.

The roof already had a bit of texture from the wood mold which it was pressed into, but I added a bit more texture to it, and hopefully the glaze will accentuate it rather than hide it.  For many of my outdoor pieces, I will be trying out the Sombright Green glaze, which is not considered food safe, but has a very pleasant range from brown (where thin) to chartreuse/green (where thick) :

So I ended up with some extruded square pieces, which I wanted to do something with.  I also ended up with a second roof, since I tried two different pitches, and wanted to see which one I liked better for my lantern structure.  So I combined the extras, and got this funky windblown house :
You probably can't see the detail too much, but on the roof, two sides are decorated using my dragon scale tool that I made myself, and the others are decorated with freeform somewhat wavy vertical lines.  I'll need to think about what cut outs I want on the sides, but I may stick to simple windows.  I'll see.

The fundraiser the other night was a resounding success, and we raised $250 by raffling off my 4 pottery items.  The one which got the most interest was the vase with the maple leaf imprints.  My sister really wanted to win that one also.  So I decided I need to make at least one more like it.  Today I trimmed one of the vases I threw last week in grey stoneware, and tonight I was pressing and poking to create this :
I hope to make a number more of these leaf-impressed vases this summer, while I have lots of different leaves available to me.

Another of my leaf imprint vases, featuring various types of ferns, was not only featured in a student exhibit, but is also published in the Spring / Summer 2016 Arts Program at Shadbolt Center for the Arts, in the "Ceramics - Adult" section :
Pretty cool.  It was a nice surprise when a friend pointed it out to me.

Wednesday, April 13, 2016

My Babies are Leaving Me

I picked some of my favourite pieces to donate to a charity fundraiser this weekend in Vancouver BC.  Instead of an auction, they have decided to sell draw tickets.  I hope they are able to raise lots of money.  I miss my pieces already.  Here they are, one last time, with the description which will accompany the pieces at the draw :

Handmade Egyptian look stoneware / pottery vase by Lily L.
This Egyptian themed stoneware vase by Lily L was wheel thrown and altered by hand.  It was made with marbled white and iron-rich yellow clay, fired to a very high temperature (cone 10), and glazed with a food safe glaze for durability. It bears the artist’s signature stamp at the back.

Handmade pottery vase with maple leaf imprints by Lily L.
This stoneware vase by Lily L was hand thrown on the potter’s wheel, and imprinted with leaves of a vine maple (Acer circinatum).  It was fired to a very high temperature (cone 10), and glazed inside with a food safe glaze.  The outside is unglazed, to preserve and enjoy the natural texture of the maple leaves.  It bears the artist’s signature stamp near the base.

Hand built coiled pottery footed bowl by Lily L.
This stoneware bowl by Lily L was hand formed from individual coils of clay.  It was fired to a very high temperature (cone 10), and glazed with a food safe glaze.  The bowl bears the artist’s signature stamp on one of the upper coils.

Handmade antique look stoneware / pottery vase / planter by Lily L.
This antique-look stoneware pot / planter by Lily L was hand thrown on the wheel, and then hand decorated with clay “sprigs”.  It was fired to a very high temperature (cone 10), and glazed with a food safe glaze.  The bowl bears the artist’s signature stamp in the inside bottom, and has a surprise decorative spiral on the foot.

Sunday, April 10, 2016

More Finished Ceramics from my Pottery Tools Course

Continuing on from the previous post, this is more of the recent finished items I hauled home.  All items made from P570 white clay, unless otherwise noted.  All bear my signature stamp somewhere on the piece, usually near the bottom :

Textured stoneware pot, by Lily L.
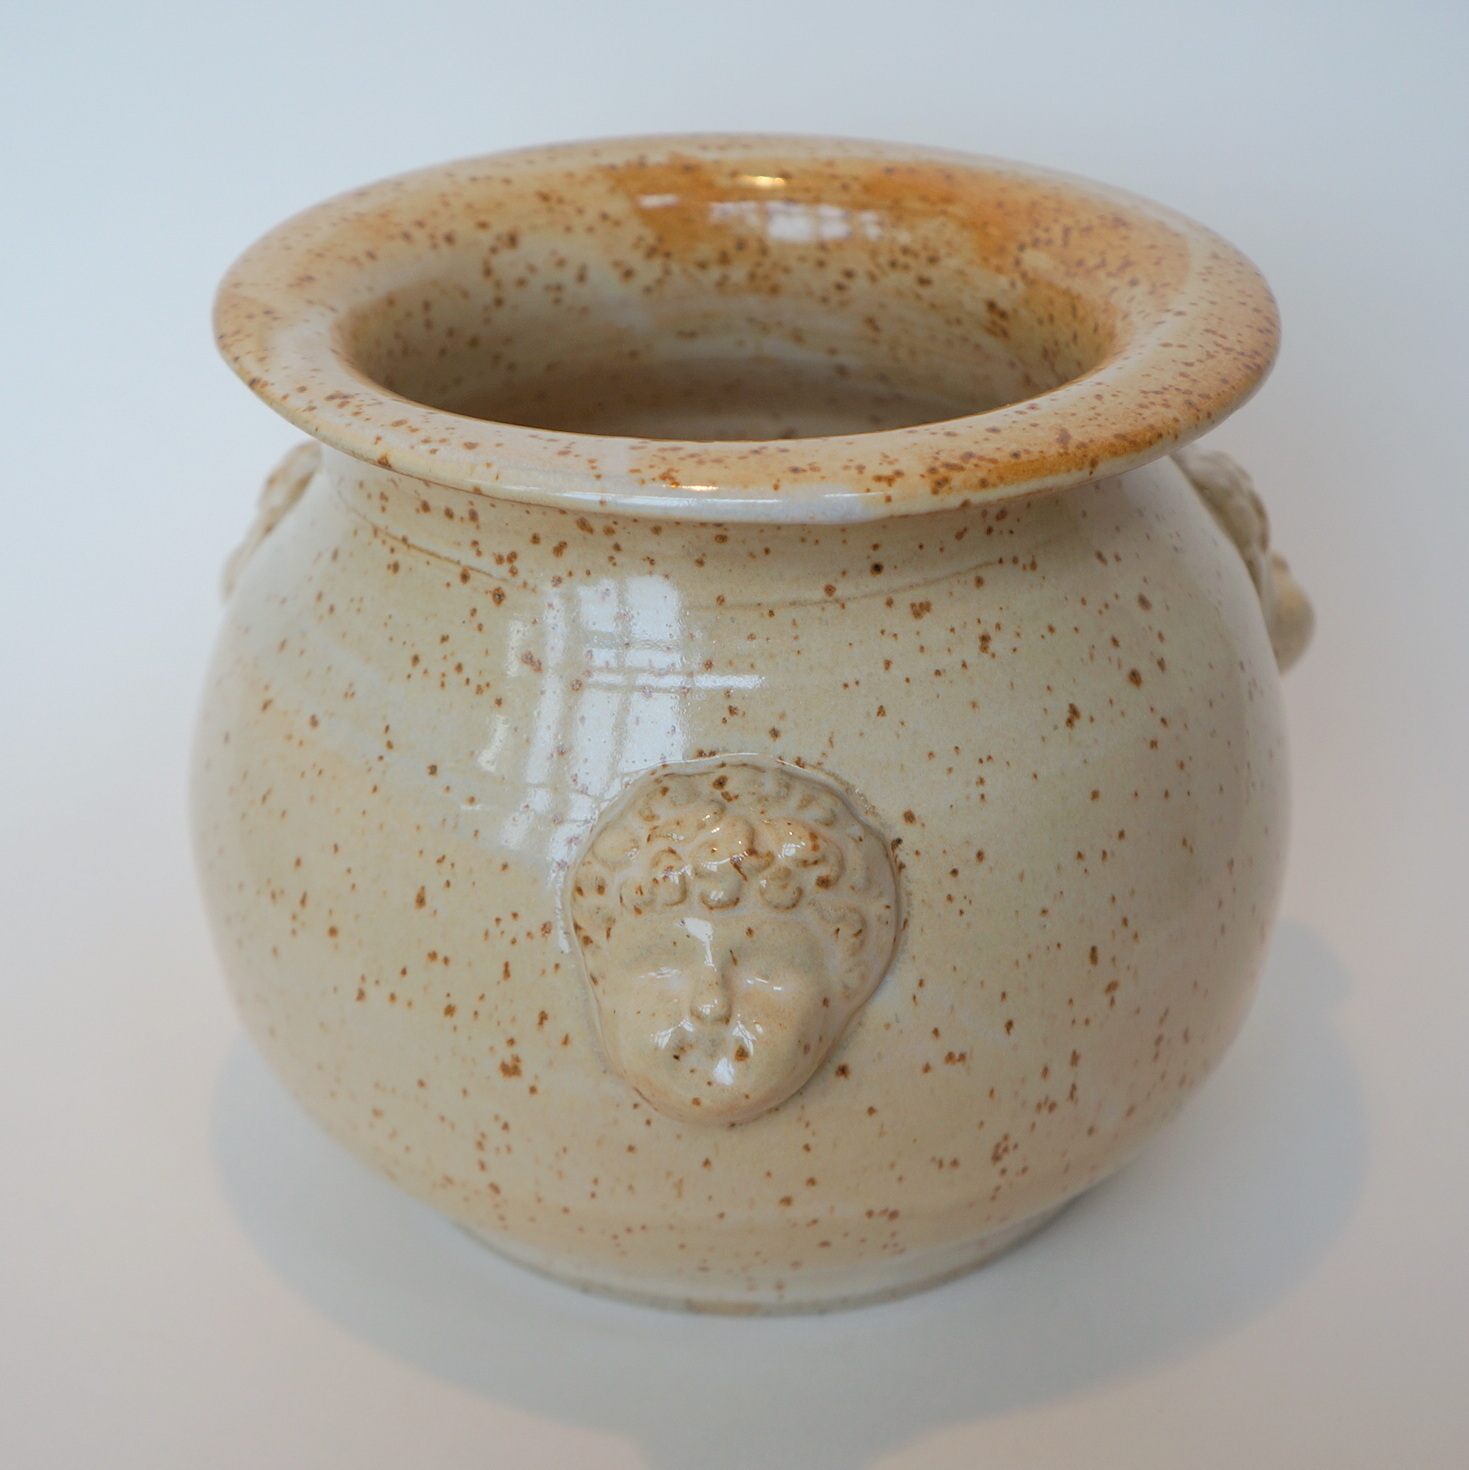
6) I'm not sure what to think of this one, but it is starting to grow on me.  It started as a pot which was too ordinary, so I applied dots of white slip to it.  If I remember correctly, I dipped the entire pot in Ash Yellow Glaze, then just the top half and rim in Deep Blue.  Then for interest, I dribbled some Khaki glaze inside.  I like that effect, of the Khaki running to the bottom of the pot.

The following are 3 tea bowls I made, so I could try out my rope textured paddle.  All were glazed with Carbon Trap Shino.


Tea bowl in Carbon Trap Shino, by Lily L.
7) This first one is my favourite.  I like the shape with the distinct high foot, so you can easily slip your hands around and under it.  I really like the shino magic : varying colours, from beige to gold to reddish-brown, to dark grey/brown.  The rim is especially nice, with a gold metallic sheen.  I like the little swirl inside at the bottom, as well as on the trimmed foot.  Unfortunately, this one has a small crack, so while it's still functional, I think I will be keeping it just for display.

Tea bowl in Carbon Trap Shino, by Lily L.
8) This one also has lots of shino colour magic, a nice clean foot, and good texture on the sides from the paddling.

Tea bowl in Carbon Trap Shino, by Lily L
9) This little cup is also nice, but doesn't have the full range of colours, and is missing the metallic sheen.  But it's still sweet, I think, as long as it is not being compared with its siblings.

Hand coiled bowl in Amber Celadon glaze, by Lily L
10) I formed this little coil bowl on our first day of class, when I didn't want to get a wheel dirty in the remaining workshop time, and finished during our second day of class.  I'm really pleased with the result, and hope to make more in future.  It was formed by a combination of large coils, and smaller plugs which were stamped with my own handmade coil stamp.  I was originally thinking to do something complicated, like stain it and then wipe off the stain for contrast, and only glaze the inside and rim and root...  But fortunately my classmate, Rob, suggested I just use a glaze which shows off the texture, such as this Amber Celadon.  I think the result is quite nice, the bowl has a good feel to it, and it certainly was a lot less time consuming.  I think I gave it an extra dip on the rim and foot, which is why the Amber Celadon is a bit heavy on the top, and almost dripping down.

11) This is the Warren MacKenzie inspired drop-rim bowl which I was able to manage on first try, although it did form a hairline crack on the back of the dropped rim while drying (which the glaze has covered).  I'm not sure I really love the result, and my teen commented that it looked like a dog bowl.  Hmmm.  What I absolutely do LOVE is the triple ringed foot.  I think that's a great foot, and something I will want to repeat again.  I also like the Amber Celadon on the outside / bottom of the bowl.  I was thinking dark so it would hide in the shadows, and help with that illusion of the bowl hovering over the surface.  But something is lacking in the Bamboo glaze on the inside / top.  At least in my opinion.  Maybe this one will find a good home somewhere.  Probably not at my house, since we don't even have a dog.  Not a real one, anyhow.  (Our little wooden dog, Cocoa, doesn't need a bowl.)

12) This is one of the two first attempts at making a twisty vase, before I figured out how to make them twist.  So I think of it as my untwisty vase.  I had a bit of trouble trimming this one, so I devised a pretty cool hybrid foot, partly trimmed on the wheel, and partly just trimmed away by hand.  The result is pretty neat, I think.  This one I glazed with Khaki inside (my dark chocolate colour!), and with iron oxide and a spray of Gerstley Borate on the outside.  It has a nice earthy, raw, textured feel to it.

13) This is my other "untwisty" pot.  It is finished in Carbon Trap Shino, which I gently wiped off (although I don't really see the effect of the wiping).  The foot was trimmed by hand into the squared off shape.  A nice pot, even if not what I was trying to achieve.

This is the end of the finished pieces so far.  I have another 5 twisty pots which I didn't glaze yet (partly since I ran out of time, and partly since I wanted to see how these untwisty ones turned out first).  I also have my carved pieces (the flower bowls and plates, and hole-punched sphere) which I am saving for the raku firing.  Although I won't be able to raku fire them all, so will need to decide how to glaze and finish them all.

Stay tuned.  I have photos from the first class, working with red stoneware, but am too tired to post now.  So far they are all planters or additional pieces for more garden totems.

First Blooming of my Dove Tree, and Garden Totems

This morning I made such a wonderful discovery, that it is worthy of posting on both my garden blog, as well as my pottery blog.  My young Davidii involucrata tree (dove tree or handkerchief tree), which I bought only 5 years ago as a small twig, and was prepared to wait up to 10 years for blooms, has had its first blooms this year.

Here is a photo of the young tree in bloom, with my small garden totems on either side.  It was a very overcast morning.  I look forward to taking more photos on a brighter day.
Young Davidii involucrata tree (dove tree or handkerchief tree) in its first bloom.
To read and see more, visit today's post on my gardening blog.

Wednesday, April 6, 2016

First Finished Ceramics from Pottery Tools Course

We had such a good time in our last course, making pottery tools from wood and bamboo and metal and such.  Many of the tools have already become good friends, and have proven useful for throwing and decorating.  We also made a few ceramic tools : anvils, a countersink-like pointy hole cleaner (sorry, don't know the proper name of this tool) and foot trimming disks.

I also experimented and made a number of ceramic items, many of them during the open workshop, since I couldn't pull myself away from the power tools in class to sit at the wheel.  Here's the set I picked up today :
It's interesting that so many of them are a reddish brown, but I have recently discovered the magic of Carbon Trap Shino and Amber Celadon, mostly when making guinomi cups in our Mud in Your Eye class.  Carbon Trap Shino glaze can give some unpredictable results, but some spectacular ones.  This time, it didn't disappoint.

1) This sweet Bartmann jug was actually one of five such jugs created during my Mud in Your Eye course, but I had held back on glazing this one, thinking I would include it in a future soda firing.  But I since decided to go ahead, and I can always make another for a soda firing (I'm signed up for one in July 2016).  This little cutie was created with 1200 g of white P570 clay.  His hair and beard were touched up with red iron oxide, and then he was sprayed with Carbon Trap Shino glaze.  I think the parts where he is more gold/white, around the face, was where I sprayed a bit heavier, and the red/brown was a thinner coat.  There is some of the Shino magic on the rim, where it is a bronzy gold metallic colour.  Love it.

2) This sweet vase was created with white P570 clay marbled with iron-rich Yellow Clay.  The egyptian sprig and the snake handles are mostly the Yellow clay.  It was sprayed with a very light coat of Carbon Trap Shino.  I love how the thin spray of the Shino gives a rich reddish brown, and the marbling shows through as a richer tone of the reddish brown.

3) These little goblets were created at the end of my Mud in Your Eye course, and didn't make the glaze deadline, so I finally got them finished and home now.  I really like how they turned out.  Lots of Shino magic again.  I am particularly pleased with the metallic gold colour which shows quite prominently on both, and on the rim of one of them.  I thought it funny that there was the reddish waist on both goblets, and I realized immediately that this was where I overlapped the glaze when I dipped the two ends of the goblets.  Interesting.

4) I really love this piece, and learned a lot from making it.  For example, you can see from the bottom of the piece (see bottom right photo), that the marbling lines are very distinct.  This is where I used my rib to really clean up the piece after throwing.  On the top part, the marbling is blurred, where I had applied the sprig too hastily, and was not able to clean up with the rib.  It is finished with the dark chocolate colour of Amber Celadon inside, and sprayed on the outside, probably a bit too thinly, with Gerstley Borate.

5) I love this one also.  It was created in a similar way, but I think for this one, I remembered to clean up the marbling before adding the sprig.  It is finished with Amber Celadon inside, and then Amber Celadon sprayed lightly on the outside, so the marbling would still show through distinctly.  I really like that colour combination.  I don't know what happened on the rim, that I ended up with that pitted texture.  Perhaps I added another dip of the Amber Celadon, but don't know why it ended up reacting that way.  but it adds interest to the piece.  I really like that grape leaf sprig.

I would love to keep going with my other photos, but I'm very tired.  I had a wonderful first class of my Garden Pottery course, but it was also physically challenging (I threw one piece which was 10.5 pounds!).  So I think I'll need to save the remainder of the photos, and the photos and notes from today's class, until another time.