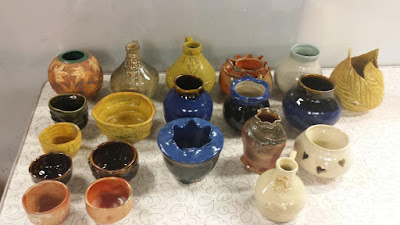
I was happy to pick up 20 more finished items today, and even happier to share the experience with my fellow "potter" and good friend Mariana :
As it has already been a long day, I unwrapped and took photos of the guinomi cups (on the left side of the photo above), as well as the carved piece on the top right. The remainder will need to wait for another night.
Some of my favourite pieces started as mistakes or vessels which were not quite the shape I was hoping for, or satisfied with. This one started as a vessel with a wonky shape, which became a great piece for carving :
14) This piece started as 2600g of Plainsman 570 white clay, which got a bit away from me while throwing. I trimmed the base only to lighten up the sides, and stamped it. Then I carved it into a trio of leaves swirling around to form a vase. It is glazed in Ash Yellow, which has a beautiful range of colours, from red to brown to yellow to green. It has a very autumn feel to it.
One of our classes focussed on making small whiskey or guinomi (sake) cups or mini tea bowls in the "wabi sabi" or natural, imperfect style. It was fun, to start with a well thrown form, and then intentionally push it out of shape. This post shows the pieces when first thrown. I am pretty pleased by the results, and would make these again, even if for the therapeutic value alone.
Pleased by the Ash Yellow glaze on one of my early guinomi cups (#7 in this post), I decided to make it some matching friends (Rose - The second arrangement of these bowls/cups is for your amusement) :
This is the large bowl :
15) The bowl started as 1000g of sculptural clay. It was hand trimmed (off the wheel) to stay with the "wabi sabi" style, and simply because it was faster than trying to stabilize and center this piece to trim the bottom on the wheel. I like the range of colours in the Ash Yellow glaze, as it picks up the intentional ridges and bumps of the piece.
16) All the little cups, including this one, started as 250g to 300g of white clay, thrown then pushed out of shape and dented on two sides with a corner of a stick. Which gives it a really comfortable place to grasp it. This one is finished in Ash Yellow glaze, and then bears what can be referred to as a "gift from the kiln Gods", a blob of who knows what on one side. This one is wheel trimmed on the bottom, and bears my stamp on the inside bottom.
17) This one was created in much the same way, but then glazed in Tam's Green, and then given a dip in Bamboo on this rim. I think I prefer the Ash Yellow. What do you think?
18) This little guinomi was finished (with a swirl inside :-) ), and then a groggy slip applied on the outside. It is almost too rough to feel pleasant to hold, but the depth of the colours are really beautiful (much nicer than it appears in the photo). It is glazed with Amber Celadon.
19) This guinomi was an experiment with texturing via roller, while it was still on the wheel. Then it was intentionally dented on both sides. Again, I really like the feel of that, for holding the cup. It is glazed in Carbon Trap Shino, which I've avoided in past, since it can range from the deep orange (as you see inside the cup) to a pasty white when applied thickly. But this time, the result was magical. It has a beautiful range of orange to gold to green on the outside. The gold is almost metallic. Quite beautiful. I hope to experiment a lot more with this Shino in future. Again, this piece is "hand trimmed" on bottom, but I think it looks pretty good (and saved me time and frustration).
20) This one was also textured with a roller while on the wheel. It is wheel trimmed, and I did a funky little pattern on the foot, and a bit of a swirl inside. Here, we're back to the Amber Celadon glaze again, with good results on highlighting the textures.
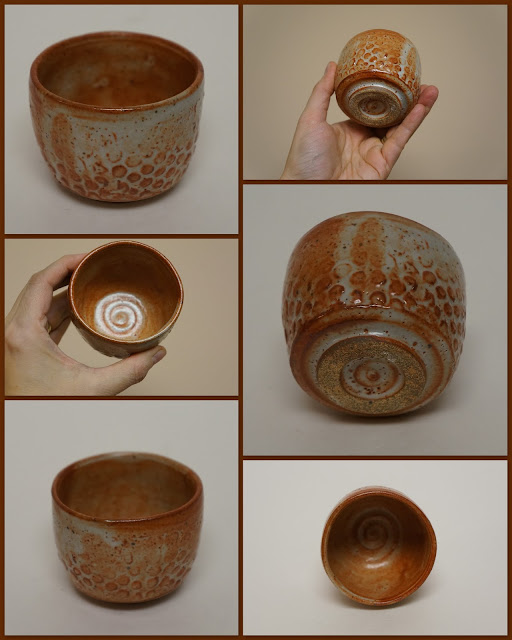
21) My notes say that this sweet little cup was thrown from clay that was white, marbled with the yellow (iron oxide rich) clay, but I don't really see much if any sign of the marbling. It was textured with a roller while on the wheel. I think of this one as "lizard skin". It has a cute trimmed foot and a nice swirl on the inside bottom. Funny, but I can't seem to find my artist's stamp on this one. Probably because I didn't want to destroy the swirl or the texture, so couldn't find a spot to stamp. It is glazed in Khaki, then sprayed clear. It has that funny brown to white range which I usually negatively associate with Shino. But in this case, it works quite well with highlighting the texture, so I think it was a success.
I see from my notes that I have one last cup to pick up. So either it is in this next firing, or I didn't recognize it on the shelves. That happens often enough, which is one of the reasons why I keep detailed notes - and photos - of my pieces as they progress.
Sunday, November 29, 2015
Pottery on Student Display at Shadbolt Center
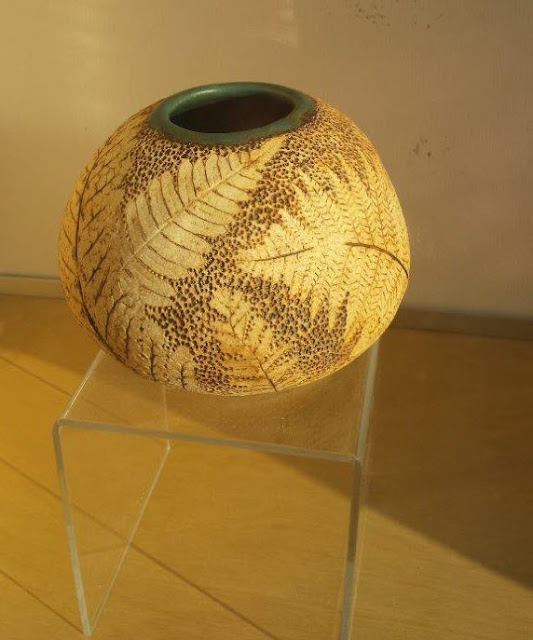
I was honored to have my little fern imprint vase (#9 in previous post) selected for a student display in the outside display window of the pottery studio. It wasn't there last weekend when I checked, but I was pleased to see it today, and surprised to see that a second piece was also on display, one of my Bartmann jugs.
Here it is with the setting sun on it :
...and then later in the evening, illuminated only by artificial light :
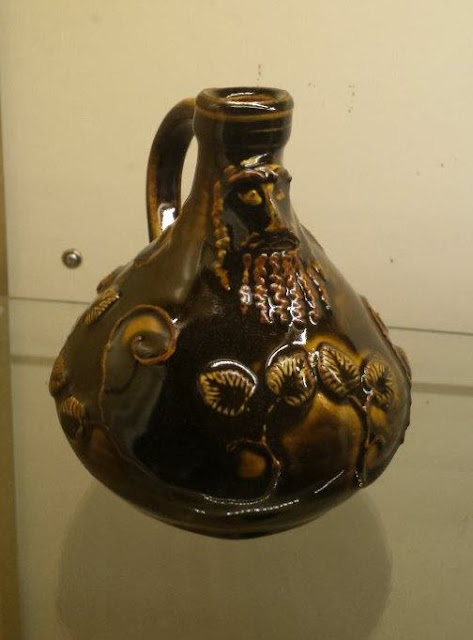
13) This small Bartmann jug (see them in progress here) was thrown from 1200g of P570 white clay, and then embellished with extra clay and slip. Unfortunately, the poor fellow has a cracked bottom, even though I trimmed him somewhat (and stamped him too). His beard and facial features were touched with a bit of "Bob Kingsmill" iron oxide based stain, before glazing him with Amber Celadon. I love the deepness of the color, and the way the glaze breaks nicely on the leaves and other embellishments. Fortunately, I had already glazed and picked up my decorative goblet (#12 in this post), so I knew the Amber Celadon would be a great choice.
I also got a better photo of my fern imprint vase (#9 in this post), this one golden from the setting sun:
I then picked up 20 more of my finished items, nearly all of them now. Next post.
Saturday, November 21, 2015
More Finished Items from My "Mud in Your Eye" Course
I have glazed all the items from my course (and drop in workshop) except a few which I thought wouldn't be bisqued in time, which I brought home, and will take in during the Spring session. So soon I will have all the remaining pieces - there are a LOT of them. But in the meantime, here are a few more which I brought home last class :
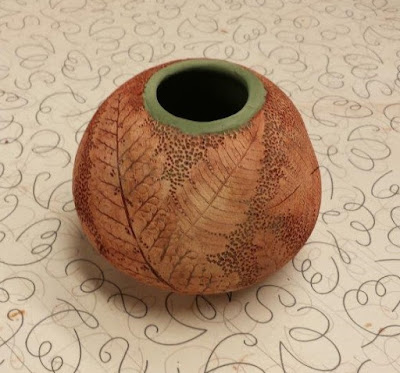
9) First, this little beauty, which I didn't bring home. I didn't even get a good photo of, since it was selected for a student exhibit at Shadbolt, so I left it with them. It will be in a display case on the outside of the ceramics building for the winter. I'm pretty excited, both at being selected for another exhibit (it is my 4th time now), as well as how well this little piece turned out. I am really loving this technique, and hope to make many more in the Spring once pottery starts up again, and there is a good supply of fresh leaves.
My notes say I started with 1500 g of sculptural clay, but lost a lot while centering. Anyhow, it is a spherical vase, with a trimmed foot, and finished with an oxide-based stain formulated by Bob Kingsmill, and glazed Matt Green inside and on the rim. It is decorated by the imprint of four different types of ferns from my garden.
10) I was glad to bring this little beauty home. It was created from 1100 g of sculptural clay, and also imprinted with leaves, this time from my viburnum bush. It was then stained with Red Iron Oxide. I left the opening at the bottom, so I could use it as a garden totem topper. We'll see. It also looks great on display inside the house. The photos turned out a bit dark; it is really more beautiful in person.
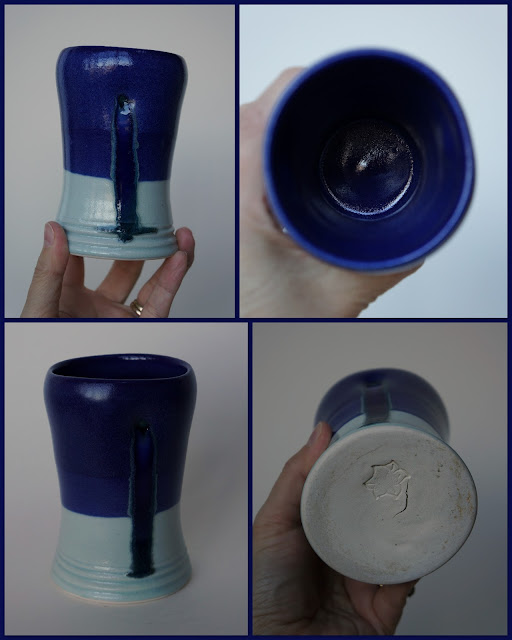
11) I missed this weisen mug when I picked up my items which made it to the first glaze firing. It was thrown from approx 600 g of Plainsman 570 white clay, and then a piece of black glaze pushed into front and back. The glass melts during firing, resulting in the big drip down the side. I'm not sure I'm crazy about the effect, but wanted to try it out.
It is glazed Deep Blue inside and on top. Celadon on bottom. It is stamped on the bottom, and also ended up with a crack during firing, although once glazed, it is still water tight, so can function as a beer glass, although a bit small for that use.
I had 4 or 5 of the bottoms of my mugs and jugs develop a crack, which is unusual for me. Maybe because I was trying a new method of finishing the pottery without trimming, and it may be a combination of bottom too thin, edges too thick, or when I tapped the bottoms so they were not flat (to prevent cracking), I may have weakened them. But funny enough, I spoke with two other students who also had unexpected cracking on their pieces. So we surmised that there was a crack fairy who was active in the kiln shed this session. I hope she's gone by January.
12) This is my first goblet. I'm really pleased by how it turned out. It was created in 3 sections, then combined together and decorated by slip trailing and adding the leaves from a sprig mold. I learned something, though. Some of the slip trailed sections were a bit rough, and the Amber Celadon glaze is almost sharp in a few areas as a result. Next time I will sand down those spiky or rough areas before glazing. But it still has a pretty nice feel in the hand. It feels like a goblet.
Wednesday, November 11, 2015
More Playing with Clay
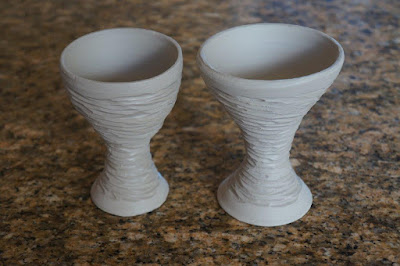
The studio was closed today for Remembrance Day (the Canadian equivalent of Veterans Day), but I had a bit of fun playing with clay at home this morning. I had two goblets I had assembled, and was thinking to finish them with the twisty vines and leaves like the last goblet, but I was not as pleased with their shape, they looked a bit clunky. So I decided to carve them instead, so I could lighten up the parts which looked too heavy. I think they have the feel of rough hewn wood (or stone). They could look pretty cool, if I don't ruin the effect with my choice of glaze. I may even try one in iron oxide, and only glaze the inside and rim of the cup. We'll see.
...and in sunlight (it was beautiful weather today!) :
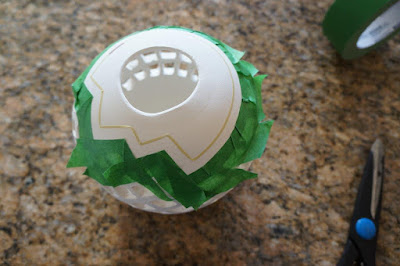
I also have my first pierced sphere (see this post and this one also), made from white clay, which I will glaze and have fired to Cone 10 (rather than raku fired, like the other two pieces). I decided to decorate it with underglazes, and then will spray with a Clear glaze. So I first taped it off, so I could get some nice clean lines :
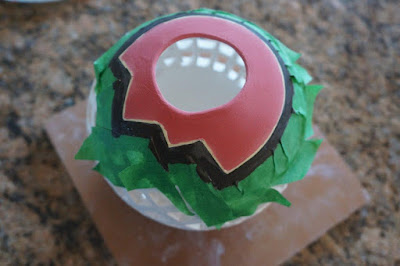
Since I won't get the beautiful black lines which I do from the raku firing, I decided to paint a section in black, and the other with a bright red :
Then I used Forest Green underglaze near the base, and Purple (although I'm pretty sure it will be Blue when fired to Cone 10) on the sides. Here it is, upside down :
...and then right side up again :
I think it could turn out pretty nicely. I can't wait until next week; it is our final class, and opportunity to finish glazing all remaining pieces. Then sadly we will be locked out of the studio for a couple of months, until pottery classes resume in late January. I don't know what I will do during that period. If I don't play with clay on my kitchen counter, I think I will go crazy.
Friday, November 6, 2015
First Finished Items from My "There's Mud in Your Eye" Class
It's been a fairly interesting course, making various vessels related to the consumption of alcohol. I have chosen to make the ones interesting to me, and skipped the ones I didn't find interesting. I had lots of other projects on the go anyhow, so didn't have any spare time anyhow.
NOTE : I plan to give one or more of these to my Honey as Christmas gifts. I am pretty sure he won't read this post, but please don't let him know, I'm hoping for a surprise...
The first set were beer related weisen cups and steins. You can see the marbling and throwing in this post. All were thrown with white Plainsman 570 clay. I then marbled in some Willamette Yellow clay (which is not available for sale yet, but my instructor gave me a bit to play with). Over all, I was relatively happy with the results, but a bit disappointed how subtle the marbling ended up when the glaze was applied. A few people have commented that they like the subtlety. I guess I'm not so much a subtle person, I like it a bit more striking. But anyhow, here they are, along with my techie notes, for my own record :
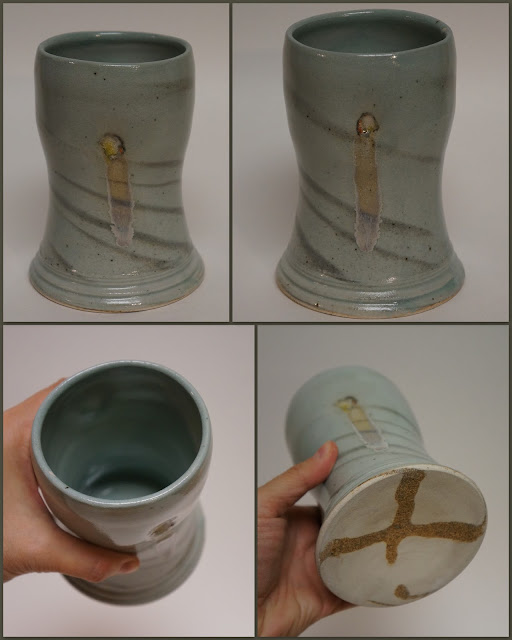
1) This weisen cup was thrown from 800 g clay, and a piece of yellow glass pushed into two sides, which then melted and ran in the final firing. You can see the distinctive cross pattern formed from the yellow (iron oxide rich) clay at the bottom, and the marbling still showing through the Celadon glaze. It is stamped in the inside bottom with my artist signature.
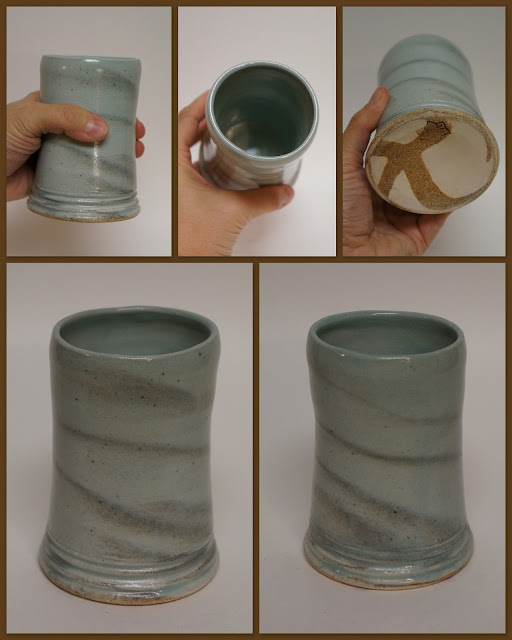
2) This weisen cup was also marbled with the same clays, and glazed with Celadon. It is stamped on the bottom.
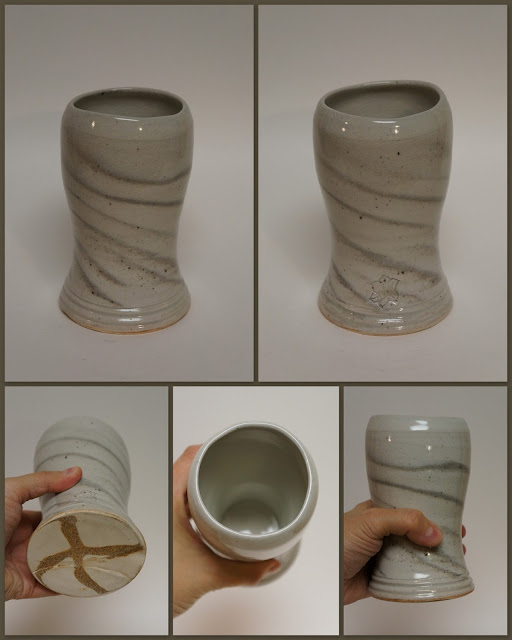
3) Another similar weisen cup. I like the curves on this one. It was also 800 g White clay with Yellow marbled into it, and finished with Clear glaze. Stamped on the side near the bottom.
4) This is probably my favourite of the set, even though after shrinkage it is a bit small for a beer mug. I really like the colours, with the Khaki inside matching nicely with the iron oxide of the Yellow clay, and I love how the Bamboo glaze broke around the wine leaf sprig, leaving the edges brown. That was better than I had anticipated. There is even some cool effect around the rim, where the Khaki ran into the Bamboo glaze. I haven't had that before. Love it. Unfortunately, it developed a crack in the bottom (see bottom right photo), but the glaze sealed it, so it still holds liquid, and can be a functional piece. It is stamped on the back near the bottom.
5) This is a sweet little vase, made from 800g clay, with just a small amount of Yellow marbled in. It is glazed with Amber Celadon inside, and Clear outside and on top of the Amber Celadon on the rim. Stamped on the side near the bottom.
6) This funky little vase was also 800 clay, with a small amount of marbling (but still a very distinctive cross at bottom!). I was practicing the narrow neck, which is not easy to throw, but practical for holding only a few flowers upright. (Or as a small corkable whisky container, in keeping with the theme of the class.) It is glazed in Celadon and stamped on the side.
7) I wanted to experiment with glazing one of my tea / whisky / guinomi (sake) cups, so I could decide what to use for the others... I think this Ash Yellow worked really well. (I think soda fired would be the other alternative I'd like to explore, with this shape). It is just a single dip in Ash Yellow, but it pools and breaks beautifully over the details of the cup, which exemplifies the wabi-sabi philosophy of embracing imperfection. In this case, intentional imperfection. The cup has a really nice light feel to it. It may actually be quite pleasant to drink from. It is stamped on the inside bottom.
8) This sculptural piece was not part of the class or anything I've done at Shadbolt so far, it was something I experimented with in my spare time. You can read about the inspiration for and origins of this piece in this blog post, and the staining and glazing here. I was a bit shocked and repelled when I first saw her, inside the finished ceramics cage, but I have to say she became much more lovely to me when I picked her up and brought her home. So I'll see whether she finds a good home here, or will go to live with my creative friend, Miranda, who really liked her the first time she saw her. I was intending to name her, maybe from a character in "The Secret Life of Bees", but I don't know that any of those characters (August, May, June) suit her. I'll wait and see.
She is finished in Red Iron Oxide stain, which I discovered turns a metallic colour when applied thickly. Her hair is finished with Black overglaze/stain, the butterfly in Yellow and Purple underglazes and Clear glaze. Her dress in a Deep Blue glaze. Her brilliant red lips are Red underglaze. I'm very happy with that red, even though I think she should choose a colour which is more suited to her skin tone. Her eyes are a combination of Black stain, one of the brown glazes, and Clear glaze. I love how they shine and sparkle. She almost comes alive.
She survived the two firings beautifully. The only accident was that I broke off a curl from the back of her neck when I lifted her onto the bisque shelf, so I stained that piece, and will crazy-glue it back on with no difficulty. There is only a tiny hairline crack in the base, but she seems sturdy and her weight is relatively balanced so she should not easily be toppled. A really big success for my first such large (11" tall and 10" wide) sculptural piece, and that with no wadding or support while building her. I'm super pleased with myself. The possibilities are almost endless now. I can't wait to attempt something equally daunting, as soon as I have some more inspiration.
Thursday, November 5, 2015
Another Leaf Imprint Vessel and Bartmann Jugs in Progress
I stained my two leaf imprint items, and hope that they will be fired before my next class, which is in two weeks. I stained one in red iron oxide :
...the other in a stain which is named "Bob Kingsmill wash", named after the ceramic artist who has taught a number of sculptural type classes at Shadbolt Centre :
On the second one, I glazed the inside, and then clumsily dripped or splashed glaze on the side of the vessel, but was able to wipe away much of it, so hopefully it will not ruin the piece.
I was so pleased with how these worked out, that I decided to finish my other large spherical vessel in leaves also, this time with a vine maple. The leaves didn't appear to be very textured / veined, so I didn't know how they'd turn out, but I was also very pleased with the result :
Here are the various steps :
Pressing the leaves into the side of the vessel, this time using the roller I ordered from China (instead of the side of a ballpoint pen, and getting ink all over my hand).
Texturing with my rubber tipped tool, starting from the bottom, and carefully avoiding my artist's signature.
Finishing at the top. Then carefully removing the leaves.
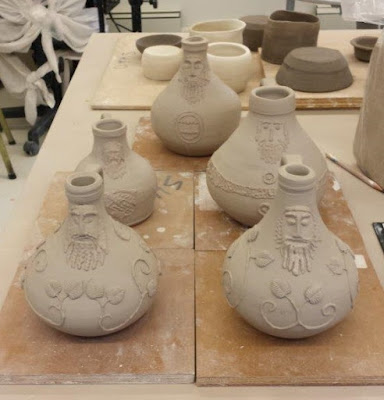
One of the other projects I've been wanting to make, which was inspired by my "Mud in Your Eye" course, is a Bartmann or Bellarmine jug. Last week I threw 5 such jugs, so this week I added handles and the Bartmann ("bearded man") faces and embellishments. I am super happy with the results. We had a number of people from the soda firing class attend the drop-in workshop, including Arlynn Nobel, the instructor. She encouraged me to save these Bartmann jugs for when I can get into a soda firing class (they are very popular, and usually have a waiting list by the time the class is announced). I think I'll experiment with a couple of them in the Cone 10 gas firing, and save my favourites for a soda firing one day.
Here are my Bartmann jugs in progress :
...and from the side :
I really had fun with these, as you can probably tell.
I also brought home my first set of pieces from the first Cone 10 firing. I will be posting photos soon.
Sunday, November 1, 2015
Three Successful Pieces from One Day Raku Session
I left this morning, and returned home about 5PM, soaking wet and cold and exhausted, but very happy. It was a very good day. And one good thing about raku - other than the fire and smoke and excitement - is that you can bring your pieces home - DONE - at the end of the day. I am extremely pleased with the results with all 3 pieces :
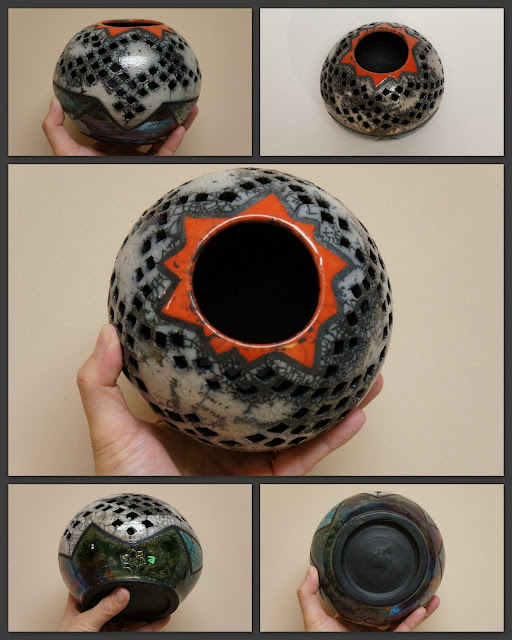
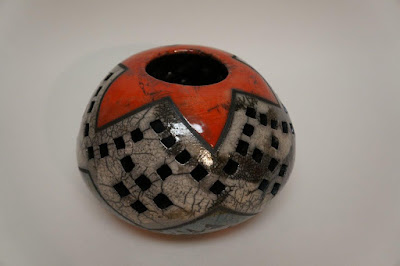
A) Look at this sweet little piece. It could be a candle holder, or just a decorative piece. I love the colours, and the crackle effect of the glazes. Here it is from a few more angles :
For my record, it was thrown from 1200 g sculptural clay. The raku glazes I used are : Red, White/Clear Crackle, Copper Penny (bottom) with triangular insets of Peipenberg Red-Bronze (which comes out a beautiful bluish colour). The black lines between glazes were marked with a 3 mm auto detailing tape, and then removed, and naturally blackened by the combustibles in the raku firing. I really like how sharp and clear the lines ended up. If I had more time, I would have liked to draw even more lines, and also try out a 1.5 mm tape. But the glazing process was already time consuming enough, and between helping with the various batches of raku firing, I felt rushed to finish my pieces before the end of the day.
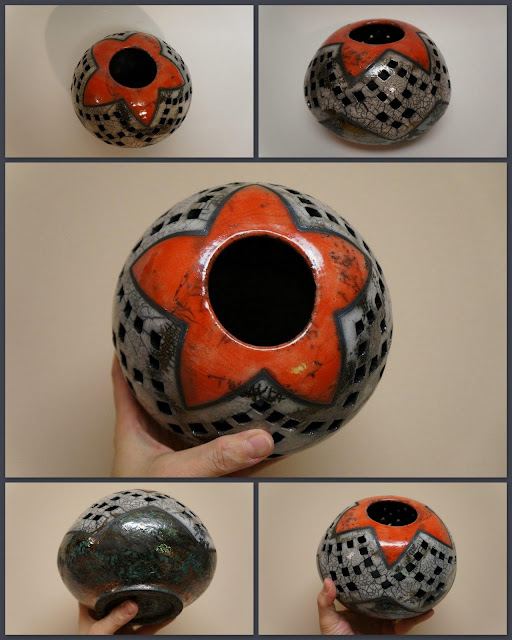
B) This is my second piece, a big brother to the previous piece. Here it is from a few more angles :
For my records, it was thrown from 2 kg of sculptural clay (that's a large piece, for me!). The raku glazes are again Red, Clear/White Crackle, and Piepenberg Red-Bronze (which comes out bluish, with some flashes of shiny bronze/copper). It really is much more stunning than even the photos convey.
C) This is my little "fish bowl" candle holder / vessel. I am very pleased with it also, especially how the fish show up in bright colours against the dark green aquatic plants. Here it is from a few more angles :
It was thrown from 1600 g sculptural clay, and then the second layer of fish and plants attached, and then the areas carved out in-between. The raku glazes are Piepenberg Red-Bronze (ring on top), Apple Crackle (aquatic foliage), then each fish finished differently, using a combination of Yellow and Red underglaze (with Clear/White Crackle glaze on top) and Red raku glaze, and for one of the fish, just Clear/White Crackle. I also used a bit of Black underglaze, for the center of the eyes (where I also avoided adding glaze), and some of the fins.
I loved my first experience with raku firing, and this one was even more successful in many ways, so I very much look forward to the next opportunity, which will hopefully be in the Spring.
P.S. I was intrigued with these raku skulls (which make me think of the Terminator movie) which are NOT MINE, they were made by David Robinson of DMR Ceramics. Pretty cool. I was tempted to ask him if he could sell me one, but it occurred to me that my family may not be as fond of them as I am. What do you think? Would you (or someone you love) like one of these on your bookshelf?
I think I would pick the very shiny one on the left.
Subscribe to:
Posts (Atom)

