Sunday, December 16, 2018

My First Commissioned Piece : Mickey Urn

Sadly, my first sort of commissioned piece was an urn for my sister's beloved canine friend, Mickey.  Since my sister is a Mickey Mouse fanatic, and her dog was named after Mickey Mouse, she looked long and hard for a Disney urn for him, but couldn't find anything suitable.  So she asked me to make him one.

I knew it had to have Mickey ears, and be the red and black Mickey colors, but I was really pleased that I could also use Mickey font and add my own handmade paw print stamps to it, for a really special result (with sincere apologies to the Disney Corporation for license infringement, I would never have done it except my sister was desperate and had searched the entire magic kingdom to no avail) :


It turned out even sweeter than I had hoped.  But then in a nasty twist of fate, the wax with alumina hydrate which I used between the lid and the vessel, which was supposed to keep the two pieces apart, didn't work.  So I ended up with this absolutely adorable pet urn, with the lid fused solid to it.

Over a series of evenings, I tried everything I could think of, or read about, involving tapping, freezing, thawing, freezing and dipping the lid in near-boiling water, spraying with WD40, and praying, and more tapping.  I only came short of using a blow torch on it, since I don't have a torch (although a friend of mine is offering a dessert torch to try).

So I'm afraid unless a miracle happens, I may need to start over again, and make another urn for my sister, this time a functional one.

At least on my second try, I think I'll keep it simpler, as on the first one, I had carved the name, and then finished all the black parts in black slip, before I started to doubt that it would be black enough, and then repeated them all in black underglaze.  The next time I'll keep it simple, and go straight to the red underglaze and black underglaze.  And I'm pretty sure I'll fire the two pieces separately in the final firing, taking the chance of warping over the chance that they may fuse again.
 

Cobalt Pieces from the Workshop with Kinichi Shigeno

I had the honour recently to take a one day workshop with Kinichi Shigeno, and learned some of his techniques working with cobalt.

I wasn't sure quite what to expect, other than I looked up some of his work, and it was quite detailed and beautiful.  So I brought along 2 bisqued plates, a vase, and a mug, to decorate.

Kinichi brought some cobalt powder, which we mixed with water in a tiny cup, for our detail work.  Jay had also mixed up some cobalt solutions, for which he had made some test tiles.  The darker stain (which went on purple) was labelled 6388 mason mix, and the lighter one (which went on blue) was labelled 6339 mason mix.  I decided I would make a couple of pieces from each.

The technique we used was to cut out shapes (in my case, cherry blossoms) from newspaper, and adhere them with liquid latex.  I also brushed on the branches directly in latex (the red lines in the first photo below).  The plate was thrown from Columbia Buff w/Grog clay, but I had covered the inside with white slip, with black underglaze on the rim and back.
We sprayed on the cobalt mixture, then removed the paper and latex.  After that, we used the tiny cup of cobalt mix, to brush on fine details.

This is the result :
Quite stunning, right?

The second plate was again CB w/Grog covered in white slip, and with black underglaze on the rim. I skipped the newspaper and just painted both the branches and flowers in latex :
This time, I added a newspaper moon while spraying the plate, and then removed it and lightly sprayed again. 

I did a similar thing with a CB w/Grog mug.

The effect is quite magical, I think :
The mug and plate make a pretty good set, even though I had not planned it that way.  Both of them are sprayed in Clear Glaze, with the plate having Deep Blue glaze on the back, and the mug being dipped on the rim with Daly Blue (to create the purple rim).

The vase, I again finished in the darker cobalt spray, this time using triangles of newspaper as a resist for the spray :

At the end of the workshop, we had a small amount of cobalt in our cup remaining, so I have another sculptural piece which I subsequently decorated in cobalt, but since that one is a Christmas present, it will need to wait until I am able to post it.

Oh, and I took a photo of the master, who was a really kind and humble man, working on one of his pieces in between guiding us and helping us with the spraying :
Some of his works involve several layers of subsequent colors and firings, and are quite elaborate.

Monday, October 29, 2018

First Pieces from the Fall : Leaf Platters

I was pleased to pick up my first new pieces from this Fall session.  Actually, all 4 leaf platters were started in the late summer, in July.  But I've finally managed to glaze them.

Let's start with this monstrous leaf, from my gunnera plant (which you can see behind me, to the upper right of the photo).
Gunnera leaf platter by Lily L (Tiger Lily Pottery).

As you can see from this photo, it is actually a small gunnera leaf.  One of the smallest I could find, and still almost more clay than I could handle.  I am trying to remember how I made it....
Gunnera leaf platter by Lily L (Tiger Lily Pottery).
(1) This platter was formed from a slab of Willamette Yellow clay, into which I pressed the gunnera leaf.  Then I draped the slab, leaf side down, over a wide bowl / mould, and as it firmed up, I worked some shape into the edges of the leaf.  And I built a sort of foot and support system so that it would hold up through two firings.  Here are a few process shots I assembled (see also this post) :
The making of a gunnera leaf platter by Lily L (Tiger Lily Pottery).

I decided to leave this one unglazed, and stain it with Kingsmill wash (which is a sort of iron oxide mix).  It will live in the garden, near my big gunnera plant :
Gunnera leaf platter by Lily L (Tiger Lily Pottery).

The other leaves are a bit smaller, and would be equally at home in the garden as on the kitchen counter...


Squash leaf plate by Lily L (Tiger Lily Pottery).
(2) I love this big squash leaf.  It was from my friend Cindy's garden, and has a beautiful shape and texture.  I can't remember if it was Columbia Buff with Grog or Willamette Yellow clay, but it seems to be the Columbia Buff clay, which turns a beautiful soft brown, and shows lots of spots through the glaze.  It was stained on top (trying to keep mostly in the veins) with Very Black stain, and then glazed with Ash Yellow.  I really like the visual texture of this, and it looks very much like a Fall leaf.  The only thing I would like more is a bit of green.

Sunflower leaf platter by Lily L (Tiger Lily Pottery).
(3) This sunflower leaf bowl was made from a slab of Columbia Buff with Grog clay, and features my handmade starburst stamp along the edges, for texture.  I applied some Very Black stain, apparently in the textured area underneath, as well as on top (although it looks like I applied less stain on the top, or did a better job wiping it off).  Anyhow, the glaze is Bamboo.  It turned a nice soft rust brown color, which again is very pleasant.  I would have probably preferred a green, but I know the Matt Green is very opaque, and the Tam's Green shows very dark on this brown clay, so I went with a lighter brown.

Sunflower leaf plate by Lily L (Tiger Lily Pottery).
(4) This sunflower leaf was formed from a slab of WSO clay, which is a white clay.  It shows quite differently with the same treatment of Very Black stain and Bamboo glaze.

I still have another gunnera leaf platter coming.  I am hoping that with all I have learned about the clay and glaze combinations, it will be even better than these ones.  But we'll see.  Glazing is a difficult art, and doesn't always deliver what you hope for.  (I'm trying to keep my expectations low.)

It's not all pottery.  The other day I took a break from gardening, and made a fun little spiral design, using beautifully colored leaves from my Cotinus (purple smoke bush) tree, and various flowers I could find still blooming at this time of year : fuschia, fall asters, rhododendron (its second flowering), and that yellow coneflower-like bloom.
Flower mandala spiral - nature in leaves.

Sunday, October 14, 2018

Some Photos of the Horsehair Raku Workshop

I posted a few of the items from the horsehair raku workshop, but what's exciting about the raku firings is not just the result, but the process.  So here are a few process shots of some of my pieces.

My small vase, getting smoked inside and on the bottom, and just about to start adding horsehair:
And then getting ferric chloride sprayed on it by Linda :

My cat getting horsehair applied:
And ferric chloride :
And cooling down :

My polar bear, just finished applying horsehair and sugar :
Still too hot to handle:

My lidded jar, which I haven't posted yet:

And the other 4 pieces, at the end of the workshop:

And a class photo, this is not even all the pieces we created.  They all turned out so beautifully :

Wednesday, October 10, 2018

Some Photos from the Horsehair Raku Firing

I really need to take some better photos of the 5 items from the horsehair raku firing, but here are a few for now.

My favourite for sure was this little polar bear, created from WSO sculptural clay :
I thought he would look good in horsehair, but he turned out better than I expected.  Especially how the horsehair followed his brow line.  The little dots are sugar.  I love the sugar.

There were suggestions that I make a tiger next time, or other animals.  I think I would like to, when I have a chance.  Although I don't know when we can realistically hope for another horsehair firing.  Perhaps in the Spring.

I would also like to make a mother polar bear with cubs.

I was also pleased with this sleeping kitty.  A few people asked whether it was a fox, and that was my other idea, to make a sleeping fox.  So perhaps next time.  It has tiny clay beads inside, so it is a rattle.  Fun, and a little unexpected.

I'm happy with how this little vase turned out also.  The brown is ferric chloride, which is toxic, but Linda graciously offered to spray our pieces if we wanted.  I do like the color.  I would also like to play with some colored terra sigillata another time, but really was in a rush just to get 5 pieces (we were allowed 6 or 7).   Afterward, I realized that I had a few eggs from the pit firing which were not too spectacular, which I could have used in the horsehair firing.  But I didn't think of this until after it was too late.

My other two pieces are an egg and a lidded jar which I think of as a ginger jar (even though I don't know what that means) but a couple of people suggested that it looked like an urn.  Anyhow, they also turned out well, so I'll post some more photos when I have a chance.

Monday, October 8, 2018

Various Vases and Mugs and Skulls

Continuing on with some of my pieces from this Summer, before I post the recent horsehair raku results....  How about these pieces?


But first, I don't believe I posted the results of the totem pieces I was working on in May 2018...  Here is the full totem :

Other than the topper, my favourite piece was this one, featuring cherry blossoms :
(11) This ball was created from Columbia Buff w/ Grog clay, pressed into two matching slump molds, and then combined together and decorated.  I love how the Bamboo glaze breaks on the edges of the cherry blossoms and twigs, and the brown clay shows through.  It was such a winning combination that I decided to go on to create two vases using the same clay and methods.

(12) These were created from those same slump molds, although in retrospect, with the amount of time it took to combine the two halves, and smooth out the seam, and then add a foot to the bottom, and cut out the opening, I could have probably thrown and trimmed a vessel quicker.  So that's what I would do if I ever make something of this design again.

(13) The base of the totem is this large stump which I threw from 5 kg of CB w/G clay, then pushed out and carved, and added a slab at the top, and colored with black and brown slips on the sides, and brown and white slips on the top.  It is fired but unglazed.  The photo is low resolution (I'm too lazy to transfer another one), but it is really a very beautiful piece.  I am super happy with how it turned out.

The little skulls are from a one day workshop I took with David Robinson, in which I borrowed his skull mold, and pressed clay into it (rather than pouring it in), to form the skulls, which I then went on to decorate.  I made 3 skulls, one of which I already posted here, and it has already gone to a good home.  I don't know what clay we were working with, but it was a white clay, something like WSO.

(14) This sweet little skull is glazed in Bamboo and Daly Blue.  It then has a spiderweb pattern painted on in Blue Overglaze, and a little spider below (which you may be able to see, faintly).  I really like that colour combination, and the diagonal pattern it makes across the face.

(15) The final skull was carved with a spirally pattern, and black slip inlaid.  It is attached to a nice decorative base, which is also finished in black slip.  Then the whole piece was glazed in Ash Yellow, which still shows the pattern quite well.

I'm too lazy to take photos of the main piece which we created during the workshop, which is a decorative wall hanging decorated in slips.  When I take photos, I'll post them also.

I played a little with image transfers also, and made a few decorative mugs.

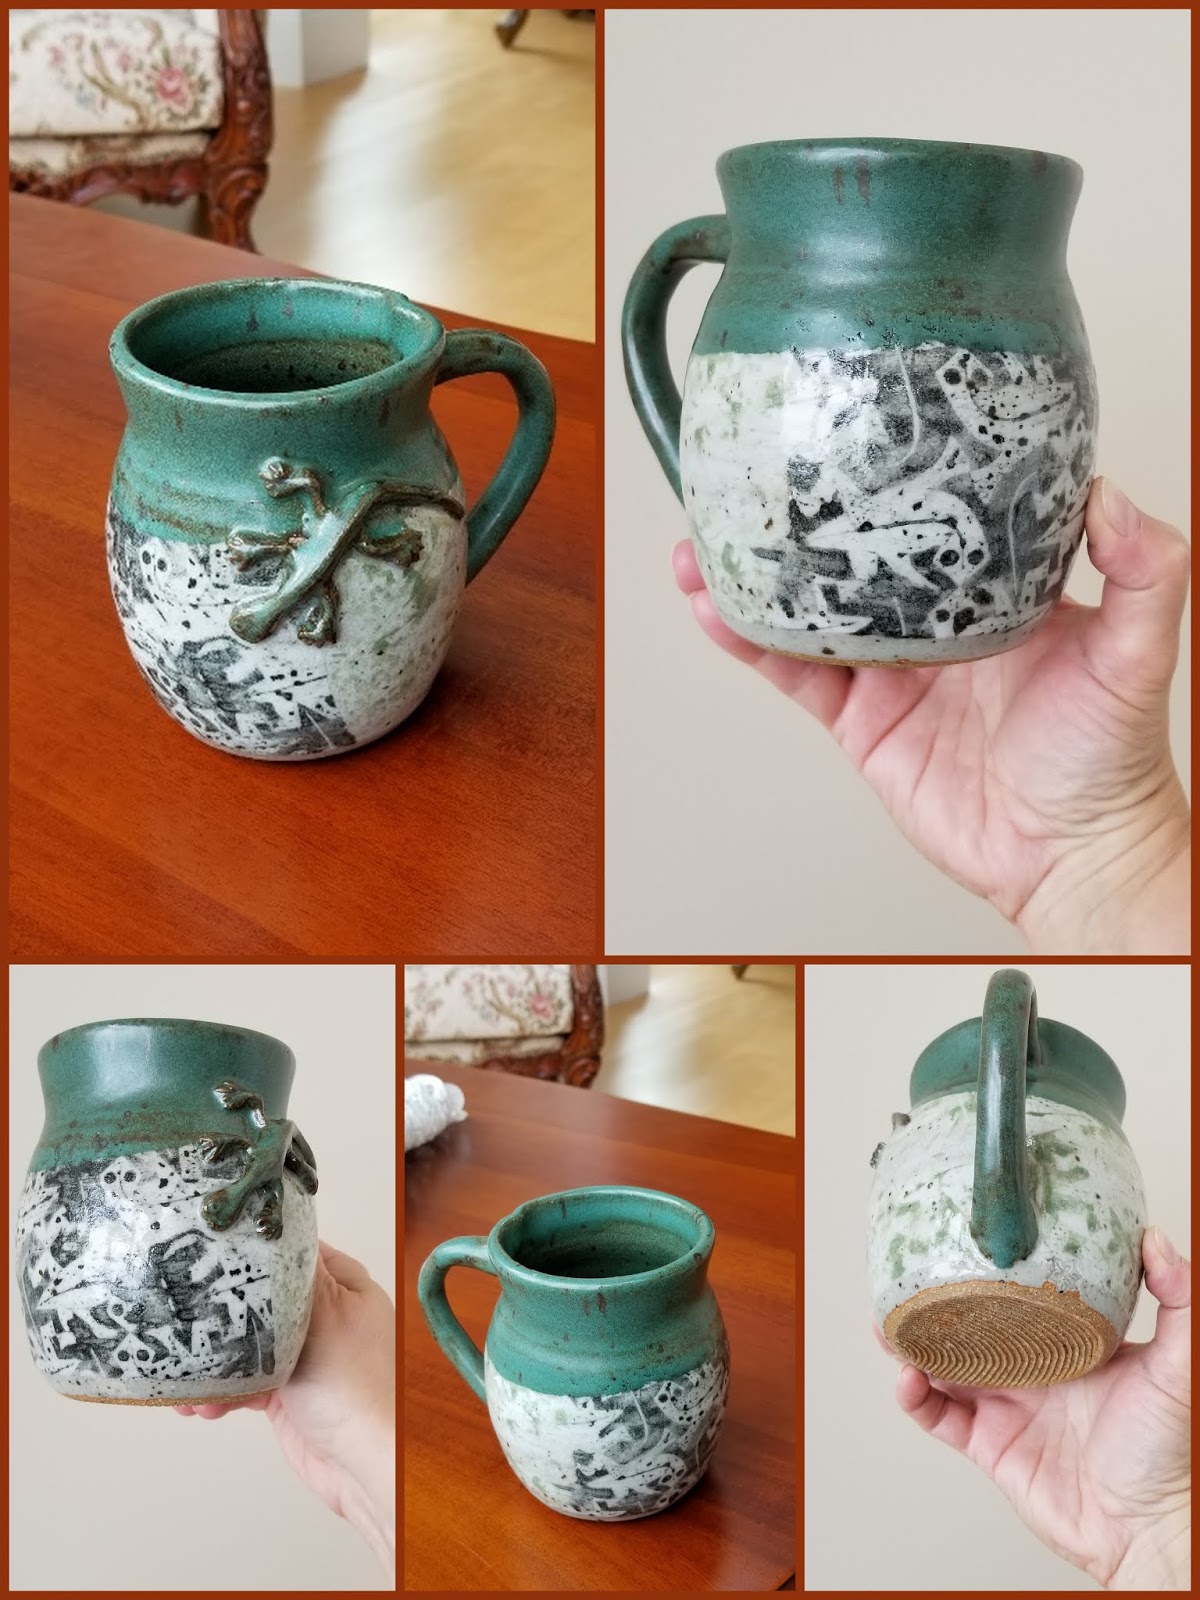
(16) This little mug made from approx 950 g of  CB w/ Grog clay is decorated in a gecko tessellation pattern, in black and green slips, on top of a layer of white slip.  It is glazed in Matt Green and Clear.  My notes seem to indicate that I first painted the gecko in Matt Green, waxed him, then dipped in Clear and dipped in Matt Green.

Here it is from a few more angles :
As you see, the bottom is textured with wiggle wire.  I love finishing my mugs like that.

(17) This little mug, thrown from 1000g of CB w/ Grog clay, is decorated in a geometric pattern of red and black slips on top of a layer of white slip.  It is glazed inside, on the handle, and on the top with Tenmoku.  My notes indicate that I brushed the body with Clear glaze and then waxed it with that wavy pattern (to simulate a drippy glaze, since nearly all of our glazes are very stable) before dipping the top in Tenmoku.  The bottom is textured with wiggle wire.

(18) This little dragon lidded vessel from CB w/G clay was created in Fredi's Vases class, using a fairly complicated technique.  The body is thrown but then altered to be oval.  I've forgotten the full details of how the lid was made, but I remember texturing the slab and draping it over a mould to get that round shape, and there was a trick to creating the shape to sit nicely within the rim of the bottom piece.  The demo piece featured a top which was strappy, so that it formed a frog for a bouquet of flowers.  I decided to make a solid piece, so I could add a dragon on top, and tail-like handles.  I realized as I was carrying the piece that I would need something to stabilize it, so it wouldn't topple over, so I came up with the idea to add a pair of feet on each side, which turned out to be a pretty nice touch, I think.  It is glazed in Bamboo, with Tam's Green used on the dragon parts, and highlights were done in red and black underglazes, with a Clear glaze overtop.

Okay, I'm mostly caught up, at least on the pieces which I've taken photos of.  So when I have a chance, I'll post photos of the recent horsehair firing, which was an smashing success.

Sunday, October 7, 2018

Leaves and More Seashell Footed Plates and More

I am falling behind on posting my new work, but I'm going to try to catch up on my summer items before I start getting more Fall work finished.  So here goes with a set of leaf plates and such.

I made these plates since I had a bit of time and clay in between making the big gunnera leaves, and they allowed me to experiment with different glazes, before I committed to something for the big plates.  Unfortunately, they were not quite the results I had wanted.

All of the leaves were created from Willamette Yellow clay, which fires quite dark.  I was hoping the glaze would brighten them up a bit, but they still turned out darker than I had hoped.

(1) TOP : This Davidii leaf is probably my favourite of the batch, and it likely the approach I will take with one of my big gunnera plates.  It is unglazed, with Kingmill wash picking up the details of the veins, and the snake below.  The snake has Bamboo glazed eyes.
(2) BOTTOM : This is probably my next favourite.  The Hydrangea leaf is highlighted with Kingsmill wash, and then glazed in Ash Yellow.  It seems I brushed it on, which is why it has slight brush marks, and the glaze is fairly thin (thin fires brown, and thicker fires yellow).  The snake below is unglazed, with only Flambe glaze to make the eyes shiny.

(3) TOP : This Davidii leaf turned out relatively well, just a little dark for my liking.  It is Tam's Green glaze on top, and the snake is finished in Kingsmill wash, with Shino glaze for the eyes.
(4) BOTTOM : This Davidii leaf is even darker.  My notes say underglaze + Tam's Green brushed on top, but I don't remember which underglaze I used, and I suspect it was only applied on the veins, and brushed off elsewhere.  The bottom features 3 ladybugs seemingly in a meeting.  They are finished in red and black underglazes.

(5) TOP : This Davidii leaf is highlighted with Kingsmill wash, and then a Green overglaze/underglaze applied to the whole leaf.  This has been my experience previously, that an underglaze often needs an actual glaze over it, to get the correct color.  In the case of green, it seems to end up brown without the presence of glaze.  So a clear glaze over would have probably worked much better.  The snake under is unglazed with just the eyes glazed in Tam's Green.
(6) BOTTOM : This Davidii leaf was also Kingsmill wash with Green overglaze.  I wish I had been able to spray (or perhaps even brush) one of these with Clear glaze, to see whether I would have obtained green.  Or whether the clay is too dark to really end up with green.

(7) This is another one of my series of 4 footed plates with seashell designs.  See the previous two in this post.  It is made from my current favourite clay, the Columbia Buff with Grog, which is currently not in stock, so I am anxiously waiting for a new order to arrive.  Hopefully soon.  This one features a small starfish, handmade by me, in combination with the other shells from my sprig mould.  The starfish is finished in FlambĂ© glaze, the seashells in White glaze, and then on one side it was dipped in Oatmeal glaze, and on the other side, probably 3 dips in Daly Blue, receding to create the illusion of waves on the beach.

(8) This is the final one in the series (for now, anyhow :-) ), it is again from Columbia Buff w/ Grog clay.  On the sandy part, I had applied white slip, and in the center, turquoise slip.  To the center, I finished it in Daly Blue (on top of the turquoise slip), and then Bamboo over the white slip.  So this one plays with darker shells on a whiter beach, compared to the previous one which is whiter shells on a darker sandier beach.  I think I prefer the result in (7), but it's always worth experimenting with different glazes and techniques, to get the one you look the most.

(9) This one is a pretty cool footed bowl I created by texturing a slab using a crocheted doily, and then draping it over a slump / hump mould.  The edges are rolled back, and the reclaimed clay (a mixture of browns and whites) was highlighted with Kingsmill wash, and then a Daly Blue glaze applied inside.  I really like the contrast between the bright inside and the dark textured outside.  The feet are textured to match.

(10) It is ironic that they look so big in the photo, as these little miniatures are only about 2" (5 cm) tall.  I realized this Spring that I don't have a good vase for lily of the valley or other little flowers from the garden.  So I made a couple of miniatures for that purpose.  They are both from Columbia Buff w/ Grog clay, and dipped in White and then Daly Blue glazes.